Creating Renders
About Renders
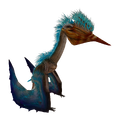
Renders are a type of image created by loading a model from JW:TG into a model-viewing program, such as Blender or Windows 3D Viewer. In order to obtain renders, you need to obtain the model first. This article will go over how to obtain models and other assets from JW:TG for the creation of transparent renders. Below are a few examples of renders:


Required Software
- Ninja Ripper
- Noesis
- Android emulator - Nox or Bluestacks will work
- Blender
- Windows 3D Viewer
- Text Editor (Notepad or Notepad++ both work)
- Photoshop or another image editing software to further process your renders. Online Image Editor will also work, but is more limited
Software Setup
Setting up JW:TG
Starting at the beginning, you need to get JW:TG running on an emulator. Most emulators have the Google Play Store or a similar feature built-in that allows you to download games and other apps. For the purposes of this tutorial, you only need JW:TG installed. Once it is installed, log into your account or create a new account. NOTE: It is difficult to rip models of creatures you do not have in your park, so a preexisting save is recommended
Setting up Ninja Ripper

With the emulator set up, it's time to get Ninja Ripper going. While the emulator is still open, open Task Manager (default shortcut is "Ctrl + Shift + Esc") and right click on the process for your emulator, then select "Open File Location" in the drop-down menu. This should bring you to the folder the .exe file for the emulator is in. This .exe file will be highlighted. Keep this file explorer window open, as you will need the file directory later.

Unzip the Ninja Ripper .zip file in the location you would like to keep the program. After it is unzipped, navigate to the "x64" folder and start the program through "NinjaRipper.exe". A small window should pop up. This is where the emulator .exe directory comes into play. Click the "..." button and navigate to the .exe file. If you have the file path, you can paste it into the explorer navbar and jump right to the location instead of digging through your folders for it. You can optionally change the directory the .rip files will be exported to. By default, this location is "C:\Users\username\NinjaRipper". It is recommended to create a shortcut for both the Ninja Ripper .exe and the output folder for quick access.
Setting up Noesis
Noesis requires minimal setup, also only requiring it to be unzipped in the desired location, but knowing where your Ninja Ripper output folder is is important. Navigating the program is fairly clunky, so having your output folder somewhere easy to navigate is recommended. The default folder location works fine for this. Using the + buttons, navigate to the output folder. For now, nothing will be in there.
Setting up Other Programs
Once Blender is installed, no extra setup is required. Windows 3D Viewer comes pre-installed on Windows 10, but will need to be installed on Windows 11 PCs. Setup for image editing software varies by program, but pretty much any program of that type can accomplish what is needed here.
Obtaining Models
If you haven't closed your emulator yet, do so now. In Ninja Ripper, click the big "Run" button. This will relaunch your emulator as the program's target. Load up JW:TG and find your target model. The best place to rip creature models is in the "Evolutions" tab in the creature's habitat, since all 4 stages can be found here. You do not have to have a stage unlocked to rip the model if you rip from here. The model you want to rip needs to be on the screen somewhere!

There are 3 keys you can press to rip assets from the game. F9 rips only textures, outputting them in a Textures folder. F10 rips models and textures at the same time, but may require multiple attempts to grab a textured model. F12 is a more intense rip, which does several captures of a scene, ripping all models and textures for each capture. Generally, F12 is the most useful for obtaining high quality rips, but creates lots of duplicate files to sift through in the process. You will know the ripping process is happening when the game freezes or jitters after pressing one of the F keys.
Once you have ripped your models, navigate to your .rip output folder in Noesis. If you pressed F9 at least once, there will be a textures folder. Otherwise, your rips will be in folders named with the date of creation. You will know you selected the correct folder if you see RIP and DDS files in the file list. Double clicking one of these will preview it. To make it easier to find the model you want, sort the files by size by clicking on the "size" button at the top of the table. Scroll down until you find larger .rip files. Creature models are usually 200mb or larger. If the model you find is white, oddly-textured, or appears to have holes in it, you may need to run the ripping process again. Look at all the models, as often you will rip both correct and incorrect models at the same time. All ripped models will be ripped in the position they are in when the rip is performed, so occasionally a correctly-ripped model will look strange if they are in the middle of an animation.
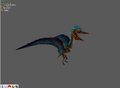
A correctly ripped model with intact skin
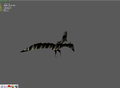
An incorrectly ripped model with a glitched skin


After you have ripped a model correctly, export it as an .fbx file. At the top left of the window, go to "File -> Export From Preview". You can change the export directory if you'd like, but by default the .fbx will be exported to the same folder as the ripped model.

If you try to open the .fbx in Windows 3D Viewer now, it will appear shiny and textureless. This can be fixed with Blender. In Blender, start by hitting "A" then "Del" to remove any items from the starting space. Next, import the .fbx file by going to "File -> Import -> FBX (.fbx)" and selecting the .fbx file you want to edit. By default, they will be very small, so hit "S" and drag the mouse to resize the model. If the model flips upside down, move your mouse in the other direction. Left click to set the model's scale once they are larger. You may need to scale them up a few times.
Once the model is large enough, navigate to the Shading workspace. It is very likely that the model will have a bright magenta color. This is normal! Click on the model, and you should see little boxes pop up in the space below the model. These are called nodes. You can ignore everything here except the "Specular" slider. Reduce that to 0. This will reduce the shininess of the model. It is now ready to export, so go to "File - Export -> Wavefront (.obj)". Exporting as an .obj creates a .mtl file as well, which tells the model what texture to use.
Texturing the Model

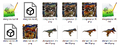
To get your texture, go back to your Ninja Ripper output folder. If you used F9 to rip textures, look in the "Textures" folder. Otherwise, it should be in the dated folder. For each creature, there will be 3 similar looking textures: Color, Bump, & Specular. The Color texture looks closest to the creature in-game. The Bump texture will look the least like the creature, usually appearing 3D-esque and strangely colored. The Specular texture will look like a faded version of the normal texture. Usually they will be ripped in this order, so the first texture of the 3 will likely be the Color texture.

If you open the model in Windows 3D Viewer again, you will see that it is no longer shiny, but likely still lacks a texture. To texture your model, open the .mtl file in a text editor (such as Notepad). Replace everything after "map_Kd" with the name of your texture (i.e. "test.dds") and save the file. As long as the model and texture are in the same folder, it should now appear textured when you open it in Windows 3D Viewer.
Creating the Render
Once it is in Windows 3D Viewer with the texture, hit "Ctrl + E" to open the "Export Image" interface. Set the type to "PNG", tick the "Transparency" box and untick "Render Shadows". From here you can rotate (left click) or pan (right click) the model until it looks good, then export the picture. Congrats, you created a render! From here, you can play around with it in Photoshop or upload it to the Wiki as is. It is recommended to edit your renders to be square, if possible.

.fbx model after exporting from Noesis. Note the shiny look and lack of texture.
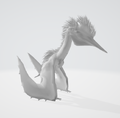
.obj model after exporting from Blender. Note the dull look and lack of texture.
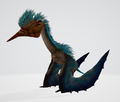
.obj model after editing .mtl file to load texture
Final render
A folder containing all files needed to create a render, as well as the final renders


